 Reviews


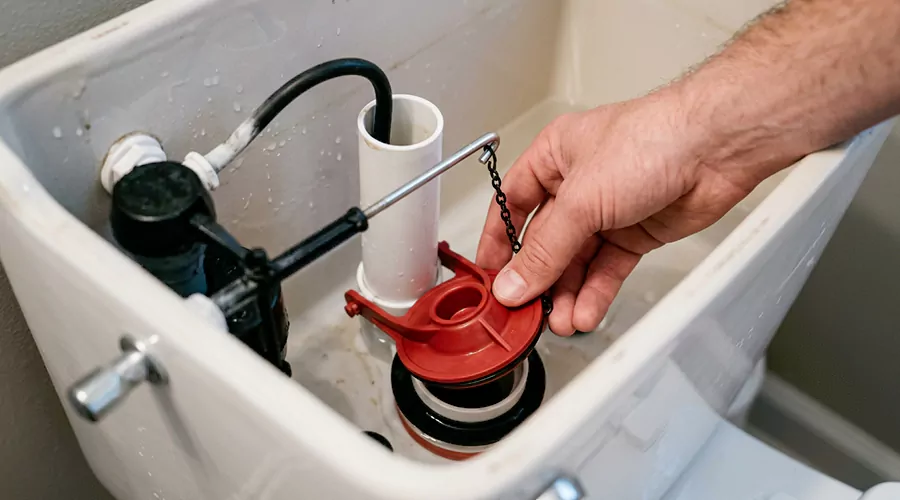
A new toilet flapper costs $5 to $15 and stops a leak that can send up to 200 gallons a day into the bowl. The swap takes under 15 minutes with no tools beyond your hands.
The process of how to install flapper on toilet tanks is identical across brands. Shut the water, unclip the old rubber, snap on the new one and set the chain.
Once you learn how to install flapper hardware on one toilet, every other toilet in the house takes five minutes. Size is the only real decision, and this guide settles it first.
Signs You Need a New Flapper
A failing flapper announces itself with sound and money before it shows visible damage. The tank refills by itself, the water bill creeps up and the rubber feels sticky to the touch. Any one of these signs justifies the $10 part.
Run through the checklist:
- Phantom refills when nobody has flushed.
- A faint hiss or trickle from the tank between uses.
- Ripples in the bowl or a fill valve cycling on and off.
- Black residue on your fingers after touching the flapper.
- A flapper that looks warped or no longer sits flat.
Insider tip: confirm with dye before you shop. Ten drops of food coloring in the tank showing up in the bowl within 15 minutes proves the flapper is your leak.
Pick the Right Flapper Size
Learning how to install a flapper valve starts with one measurement, because flappers come in exactly two sizes. About 80% of toilets use the standard 2-inch flapper while 3-inch flappers fit the remaining 20%. Half of how to install flapper in toilet success is buying the correct one.
| Clue | 2-inch flapper | 3-inch flapper |
|---|---|---|
| Drain opening looks like | An orange or baseball | A grapefruit or softball |
| Toilet age | Mostly 1950 to 2000 | Mostly after 2000 |
| Old flapper measures | About 3 inches across | About 4 inches across |
The measuring quirk trips people up. A flapper that measures 3 inches end to end is a 2-inch flapper, because the size label refers to the valve opening rather than the rubber disc.
Insider tip: shopping without measuring? A universal fit-all model covers both 2-inch and 3-inch valves and removes the guesswork for a few dollars more.
Remove the Old Flapper
The first step of how to install a new flapper in toilet tanks is getting the old one off cleanly. Water goes first. Shut the supply valve behind the toilet, flush and hold the handle down to drain the tank as far as it will go.
- Sponge out the last inch of water so you're working dry: Undo the chain clip from the tank lever arm, then gently pull the flapper arms up until the clips release from the mounting posts. Older styles slide instead of snapping: a ring-mounted flapper pulls straight up and off the overflow pipe.
- Take the old flapper with you to the store: It answers the size question and the mounting-style question at the same time.
Install the New Flapper Step by Step
Here's how to install a flapper in a toilet in five steps once the old one is out. The full job takes about ten minutes. Every step happens inside the tank, so nothing here can flood your bathroom.
- Clean the seat: Wipe slime, minerals and grit off the smooth ring where the flapper seals so the new rubber sits flat.
- Match the mount: The trick of how to put a toilet flapper on is reading the overflow tube. Posts on the tube mean you align the flapper clips over the pins and push down until they snap.
- Adapt if needed: The way of how to put new flapper on toilet tubes without posts is the ring mount, so slide the ring over the overflow pipe and push the flapper all the way down until it sits flush on the seat.
- Seat it square: The flapper must sit evenly to create a proper seal.
- Attach the chain: Clip it to the lever arm hole nearest the flapper.
Insider tip: on universal two-size flappers, the sizing pieces come stacked. For a 2-inch valve you remove the large seal components before snapping the arms onto the posts. Read the kit card before assembly.
Set the Chain and Test the Seal
Chain slack decides whether your new flapper works or leaks. The final part of how to install flapper in toilet tank setups is attaching the chain clip directly above the flapper with about a half inch of slack. Too tight holds the flapper open. Too loose stops it from lifting.
- Now test under pressure: Turn the water back on, let the tank fill and flush to check the operation. Watch one full cycle with the lid off. The flapper should lift completely, drop cleanly and seal without the chain catching on anything.
- Finish with proof: Wait 10 minutes, then run the dye test again to confirm the seal holds. A clear bowl means the job is done.
Troubleshooting a Flapper That Still Leaks
A new flapper that leaks is almost always fighting its seat rather than failing itself. Mineral scale, wrong sizing and water level cause the three repeat offenders. Each takes minutes to rule out.
- Scale comes first: Part of how to install a toilet flapper valve correctly is dressing the seat, so shut the water off again and scrub the sealing ring with a scouring pad until it feels glassy. Size comes second, since a 2-inch flapper floating on a 3-inch opening can never seal.
- Water level causes the sneaky version: A fill level set too high spills into the overflow tube and runs continuously, so adjust the float until water sits about a half inch below the overflow tube's top.
One last look-alike deserves a mention. People searching how to install a flapper in toilet sometimes own a canister-style tank, and a canister tower takes a model-matched seal from the manufacturer's parts diagram rather than any flapper.
When to Call a Professional?
Call a plumber when the leak survives a new flapper, a clean seat and a correct water level. At that point the flush valve itself is likely cracked or corroded, and toilet replacement may be the better option if the toilet has broader damage.
Water on the floor around the base or a wobbling toilet is a separate structural problem that no tank part will fix. Those symptoms point to the wax ring or flange and belong on a plumber's ticket.
Make the New Flapper Last
Flapper rubber dies from chemistry more than use. One habit change doubles its life for free. Bleach is the killer, and the warning comes straight from the manufacturers.
Never use in-tank drop-in bowl cleaners containing bleach or chlorine. The tablets sit inches from the flapper and soften the rubber within months. Clean the bowl from the bowl side instead. Beyond that, run the dye test twice a year and wipe the seat during normal bathroom cleaning.
Conclusion
One rubber disc controls your entire water bill's toilet line. Match the size to the valve opening, clean the seat and leave a half inch of chain slack, and the leak ends for years. A leak that survives all three fixes has earned a plumber's opinion. This week, dye-test every toilet in the house before the water bill does it for you.